How to test the surface resistivity of semiconductor materials
Many important parameters of electronic devices are closely related to the resistivity and the uniformity of its distribution, such as the reverse saturation current of the diode, the saturation voltage drop of the transistor and the magnification β, etc., which are directly related to the resistivity of silicon single crystal. Therefore, the resistivity test of devices has become an important process in chip processing, and its uniformity control and accurate measurement are directly related to whether power devices with better performance can be manufactured in the future.
Unlike using a multimeter to measure conventional conductor resistance, the measurement of semiconductor silicon single crystal resistivity and other metal thin film resistivity in the microelectronics field belongs to the micro-zone thin layer resistance test, the need to use a tiny signal power supply and high precision measurement equipment, including the test wiring method, also need to use the four-wire connection method to enhance the accuracy of the measurement results, known in the industry as the four-probe test method.
What is the four-probe test method?
The four-probe technique can be tested on wafers and thin-layer resistances, such as silicon substrate wafers, milled wafers, epitaxial wafers, ion implanted wafers, annealed silicon wafers, metal films and layers. Probe analysis can be used to detect the uniformity of thin layer resistance across the chip surface and thus determine the problems in the ion implantation wafer and the injection process.
The four-probe method can be divided into straight four-probe method and square four-probe method according to the measurement shape.
1)Straight four-probe method
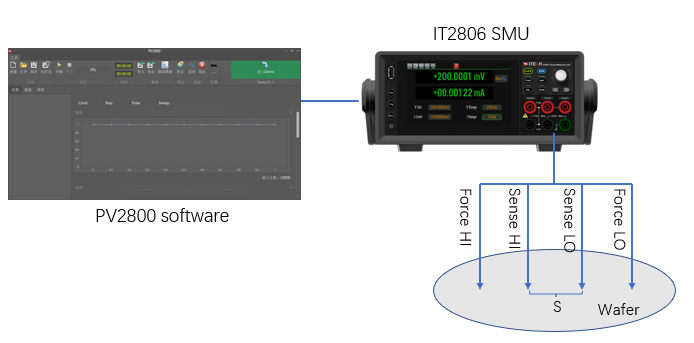
The principle of the linear four-probe test method is to press four probes with a needle distance of 1 mm on the flat surface of the sample at the same time, use a constant current source to pass a small current to the two outer probes, and then pass a small current to the two middle probes, and then in the middle two probes with a high precision digital multimeter to measure the voltage, and finally according to the theoretical formula to calculate the resistivity of the sample, resistivity calculation formula:, S represents the probe spacing.
The straight-line four-probe method can measure inhomogeneities in areas more than three times the size of its probe spacing.
Test equipment: probe station with different probe spacing + IT2806 high-precision source measure unit + PC software PV2800
IT2806 High Precision source measure unit: Combing the capabilities of six devices in one (Voltage Source, Current Source, 6 ½ Digital Multimeter (DCV, DCI, ohms), Battery Simulator, electronic load and Pulse Generator). In the resistivity test, the IT2806 high-precision source measure unit can be switched to the constant current source mode, and the small voltage drop between the two middle probes can be measured at the same time as the output current, and the free PV2800 host computer software can be used to automatically obtain the results of resistivity measurements.
Advantages of using IT2800 series high-precision source measure unit to measure resistivity:
Easy testing: The ITECH IT2800 series high precision source/measurement unit (SMU for short) comes standard with the free uplink PV2800 software and an optional probe stage with different linear probe spacing, which can directly produce resistivity test results using the software's built-in formula.
High test accuracy: up to 100nV/10fA resolution, current measurement accuracy up to 0.1%+50pA, voltage measurement accuracy up to 0.015%+300uV; provide forward/reverse current continuous change test to improve test accuracy.
2)Square four-probe method (e.g. Vanderbilt method)
The Vanderbilt method is suitable for testing flat, uniform thickness, arbitrary-shaped sample materials that do not contain any isolated holes. Compared with the linear four-probe method, there is no requirement for the sample shape. During the test, the four probe contact points must be located at the edge of the sample, and the test wiring method also provides constant current at two of the probe points, and measures voltage at the other two points. Eight measurements are taken around the sample and these readings are combined mathematically to determine the average resistivity of the sample. Detailed test methods can be found in ASTM standard F76.
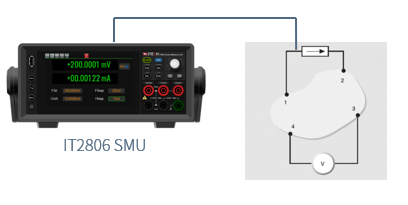
Summary: IT2800 series high-precision source/measure unit can accurately realize the resistivity test of semiconductor sheet resistance, thus providing data basis for the improvement of semiconductor manufacturing process. IT2800 SMU provides professional testing solutions for the industry due to its high-precision measurement and rich advantages of probe station fixtures.

